
2017 FOs 14-16 : Pants and more pants

2017 FOs 14-16 : Pants and more pants

The most momentous thing for me this year, as a person trying to make most of her own clothes, was deciding to make pants as a part of my Summer of Basics. I think it’s at least as life-changing as having decided to make sweaters a few years ago. (Note that I’m saying “deciding” and not “learning” — making pants is sewing, and making sweaters is knitting. They are just different applications of those skills from what I had previously done, and it’s genuinely more about simply deciding to do it than anything else.) Up until a few months ago, the one giant piece of the wardrobe puzzle that I felt I couldn’t exert control over was pants. And that’s a big one for me since, A) I wear pants about 98% of the time, not being much of a skirts/dresses girl, B) I have fit issues with pants (most women’s pants don’t fit me) and C) I am incredibly picky about the shape of my pants. So to have such a key and complicated aspect of my wardrobe be at the mercy of others has been a lifelong challenge. And to have cracked that nut is enormous.

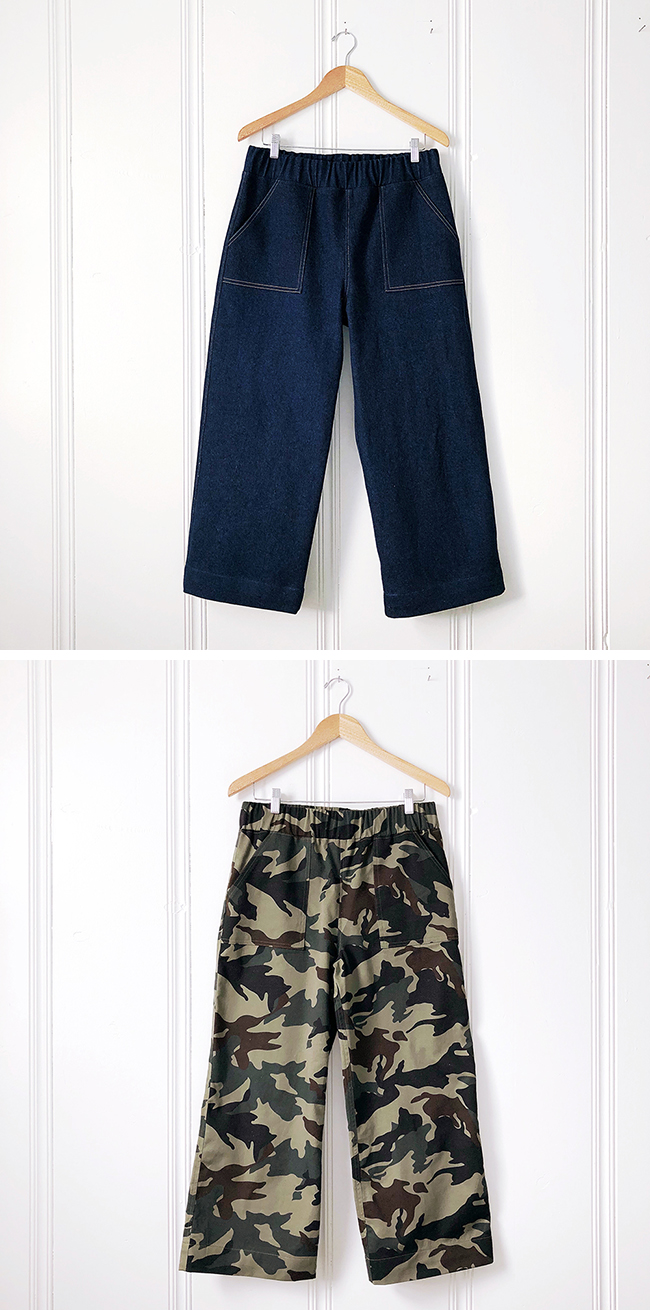
Certainly sewing jeans was a big effing deal, but these “toddler pants” (as I really need to stop calling them) have had a way more dramatic impact on my closet. And they’re so simple to make! Hence why I’ve now made 4 pairs of them. My lifelong preference is for wide-leg — I watched a lot of Katherine Hepburn movies when I was in high school — and that’s obviously a thing that comes and goes from stores. So I’ve always had to stock up when I find a pair I like. Which might also explain why I immediately cut out 3 more after making the first pair.

These are all essentially the same as my olive-green modified Robbie pants. To recap: I use the leg pieces from that pattern, with a few fit tweaks (noted below and previously), but with my own pockets and a 2″ waistband. Barring any dumb mistakes, I can cut and sew a pair in about 3 hours, so I’m tempted to cut up a lot more of my stash into these exact same pants. The exaggerated shape and utility pockets are both really current and really always-me, and the elastic waist suits my life. Not only do I do a lot of bending, lifting and hauling things, squatting or sitting crossed-legged on the studio floor shooting photos, etc., but comfort is just really critical to me. If I’m not comfortable in my clothes, I’m distracted by that, and with my daily to-do load I can’t afford to be distracted. So for all of those reasons and more, these pants have been a godsend.
2017 FOs 14-16 : Pants and more pants

FO 14: DENIM
These came right after the olive ones and are identical. After marking a change to the pattern to lower the waistline in the back, I forgot to actually do that when I cut them out. Whoops! I also bought stretch denim by accident (at Fancy Tiger while I was there) but just went with it. These are currently my favorite pants, but they are rather heavy in this heavy-weight stretch denim. Next pair will be lighter and non-stretch.

FO 15: NATURAL
When Kristine Vejar was in town to teach in September, she brought me the most thoughtful gift: a length of Huston Textile’s Union Cloth — climate-beneficial California wool and West Texas cotton, woven in California — that happened to be exactly enough for a pair of pants. It’s incredible fabric, unlike anything I’ve ever owned. And as you may have seen, I was sewing with it on the day of the Climate Beneficial Fashion Gala to console myself for not being able to be there — cruising along, feeling pretty pleased with myself … when I absentmindedly attached my waistband to the wrong side of the pants. And serged the seam allowance. If you’ve ever worked with fabric off a smaller loom like this — where there are fewer, larger strands per inch — you know how shreddy it is. And of course I had used a nice tight stitch. So ripping out the construction seam was a painstaking operation, done a little at a time, and then I had to actually cut off the serged edge to separate the waistband from the pants. So these wound up with a 1.5″ waistband instead of 2″, and they’re slightly lower waisted. But they’re kind of perfect, for all that. As special as they are, I’m going to try not to treat them as precious.  Although you probably won’t find me cross-legged on the studio floor in them …

FO 16: CAMO
These were the third to be cut, and their whole reason for existence is so I can wear my beloved old camo pants much more sparingly for however much longer they manage to last. These don’t begin to hold a candle to those spectacular old dears, but they’re pretty great. For this pair, I did lower the back waistline about an inch and I also trimmed away some of the “excess” fabric in the butt and legs (due to my flat ass). So the fit of them is a little more traditional, but I really prefer the baggier ones. This fabric is the dead opposite of the natural pair as far as origins — it’s made in China, purchased from JoAnn online. It’s also on the thin side for pants, despite the product reviews on the website. If anyone knows of a more earth-friendly, heavier duty camo source, please let me know!

To see copious pics of the denim and camo pairs on me, in combination with my other garments, see my 20×30 outfit recap. The natural ones up top are pictured with my Channel cardigan.

.

PREVIOUSLY in FOs: The purple lopi pullover

SaveSave

SaveSave

SaveSave

SaveSave

SaveSave

SaveSave

SaveSave

SaveSave

SaveSave

2017 FO-13 : The purple lopi pullover

Finished: Purple lopi pullover

After a year and a half, I finally knitted the second sleeve of the top-down tutorial sweater and seamed them both up, and the sweater is — more or less — finished! And I do adore it. As it’s fully documented in the tutorial, all I really need to tell you about it is the finished counts and measurements, below. But what I mean by “more or less” is A) I need to take a second pass at the neckband and seam up the basting stitches in the raglans, but B) I think it might become a cardigan! (Which would obviate redoing the neckband.) I knitted this in Lettlopi for the sake of the tutorial because it knits up so quickly at this gauge, and I absolutely love the color, but I don’t have a lot of cause to wear an Icelandic-wool pullover in Tennessee! (I only get away with the black one because it’s short-sleeved and cropped.) Plus ever since taking the elastic out of the waistband of that older J.Crew boiled-wool pullover, I don’t really need another purple pullover, either. So I think it would get more wear if it were vented — i.e., if I turn it into a deep V-neck cardigan, which would then be some semblance of that purple cardigan I saw a few years ago and have still never gotten out of my head.

It would be good fun to do, since at this point the only way to go about it would be to machine-stitch along the contours of where I want to cut it, and then add the button band. I can’t imagine trying something like that (for the first time!) with any other garment than this, as there’s less than forty bucks’ worth of yarn in this sweater. On the other hand, I do already have a purple cardigan, albeit quite different. So I’m pondering.

Pattern: Improv
Yarn: Lettlopi by Istex in Color 1413 (purchased at Tolt)
Cost: free pattern + 7 balls of lopi at $5.50 each = $38.50 (I know!)

Finished: Purple lopi pullover

GAUGE

3.75 sts and 5.5 rows = 1 inch (measured over 4″ = 15/22) knitted on US10; ribbing on US9

TARGET MEASUREMENTS

39″ chest = 148 sts
12.5″ upper arm circumference = 50 sts (10 at underarm)
9″ yoke/armhole depth (50 rounds)
13.5″ body length (2.5″ hem ribbing)
22.5″ total length
16″ sleeve length (3.5″ cuff ribbing)
7.5″ cuff circumference = 40 sts

DETAILS

— CO 51 sts, divided with markers as follows ( 1 | 2 | 9 | 2 | 23 | 2 | 9 | 2 | 1 )

— Increased for a basting stitch in the center of each 2-st raglan

– Planned on 10 sts cast on at each underarm, and divided the raglan stitches evenly between sections when separating sleeves from body

— Worked raglan increases as kfb on either side of the raglan stitches

— Increased at the front neck and all raglans on 1st RS row then every other row until 14 sts each front, 37 back sts. Cast on 9 sts and joined in the round (front sts at 14 each + the 9 cast on = 37 front). Neck depth approx 3.5″

— Increased the front and back until 64 sts each (counting 2 from the raglans at separation, plus 10 per underarm cast-on = 74; front + back + underarms = 148)

— Increased the sleeve-side raglans until 39 sts (counting 2 from the raglans at separation, plus 10 underarm cast-on = 49); work-even till separation at 9″ depth (adjusted to 50 sts when starting sleeves)

— Sleeves were knitted flat, decreased 5x (40 sts), every 8th row after the first couple of inches, then switched to US9 needles and worked 1×1 ribbing for 3.5″

— Worked body even for 10.5″ (with a basting stitch at each side seam, to be mattress stitched later), then switched to US9 needles and worked 1×1 ribbing for 2.5″

— Worked the neckband as 1×1 ribbing for 2.5″ and did folded neckband

— Seamed chest circumference is approx 39″, for about 4.5″ positive ease

.

PREVIOUSLY in FOs: Refashioned army jacket

SaveSave

SaveSave

2017 Remake 2 + Slotober wardrobe challenge

2017 Remake 2 + Slotober wardrobe challenge

It was my intention for today to post October outfits and a fun little wardrobe challenge, but I got caught up in my own challenge and didn’t get the outfits done! Here’s the idea: Have you ever seen Lee Vosburgh’s 10×10 challenge or similar sorts of things? Lee routinely challenges herself to pick out 10 garments and make 10 days of outfits out of them. I’ve never actually done it, but it’s fun to watch! Jess Daniels suggested to me last year that it would be fun to include something similar as part of Slow Fashion October and I didn’t manage to pull it off. During Slotober last year, Jess set a challenge for herself of picking 1 garment per week and wearing it 6 different ways (documenting each day on Instagram), and there have been a couple of people the last two years who wore 1 dress 30 different ways for the month. I don’t know if I could do any of that, but I love all of those ideas and, as you know, my quarterly wardrobe planning thing this past several seasons has boiled down to me picking out 20 or 30 garments that will form the core of the season for me, and putting them together any variety of ways. I also really loved my Paris packing list (and my Squam one, for that matter) and how many outfits I got out of those very few garments.

So I decided that for my October wardrobe planning, I would challenge myself to pick 20 garments (including shoes??) and make 30 outfits out of them. It’s a 20×30. And I’m wondering if you might want to play along — with this idea or any of the above, or any variation you might cook up for yourself. It’s a parlor game, sure, but it can also be pretty amazing to see how far some pieces will go. And it’s also a great way to make sure things get worn that you keep meaning to wear but somehow don’t. That’s the challenge part!

And then here’s what happened: I had plans to make more of my beloved toddler pants (like my olive ones) and knew I wanted them to factor heavily into my October, so have been head-down at the sewing machine since Friday night. Plus there’s a refashion I’ve had in mind for three years that I decided to do yesterday — live in my Story on Instagram — in honor of the first day of Slotober, after finishing the second pair of pants (which I’ll show you soon). So instead of putting together my 20×30 this weekend, I was sewing for it! But it was extremely productive, and it’s not like I can’t get dressed in the meantime, so I’ll have my 20×30 plan to share on Wednesday (after tomorrow’s Slow Fashion Citizen interview with yours truly).

Meanwhile, what about this remake? This is an army-green men’s shirt I got off the clearance rack at the J.Crew outlet three summers ago, when we had just moved to Nashville, our stuff was in storage, and I was living out of a suitcase for two months. It’s perfect in a lot of ways, but in addition to being a little too mannish and a little too military, even for me, it was weirdly high-cut on the sides, awkward. From the beginning, I’ve had the urge to lop it off and make it into a cute little cropped shirtjacket. So yesterday I cut off the bottom, sliced those scraps into 2.75″ wide strips, sewed them together into two long strips (deliberately not caring where the seams wound up — I love random piecework), assembled them into a waistband and reattached it all. It took me a couple of hours, as I was making it up as I went, but I had a blast doing it. And now instead of a regrettable unworn thing taunting me from the end of the clothes rail, I have this awesome new little layering piece! You’ll be seeing more of it.

The only thing I really debated was the button tab on the new waistband. That’s how I’d always pictured it, for some reason, but when it came time to commit, I wavered. In the end, I’m glad I went with it. “First thought, best thought.”

This is just the sort of thing I used to do all the time as a teenager — cutting stuff up and hoping for the best. This one worked out better than most of those high-school experiments, and I hope to be doing it more often!

.

PREVIOUSLY in FOs: My first jeans

2017 FO-12 : My first jeans

MADE: My first jeans

I always think I don’t have much to say about any given FO — that the post will be mostly pictures. And then I inevitably proceed to write 3000 words. But I feel like I have just three words to say about this one: I. Made. Jeans. I’ve said it about a hundred times since it happened. I made jeans. But beyond that, there really isn’t a lot to say, since, as it turns out, there’s not much to it! Open up the pattern, find your size, follow the instructions (and/or the tutorials or online class), and you’ll wind up with a pair of one-of-a-kind jeans. So many sewers told me that, and it turns out to be perfectly true.

MADE: My first jeans

In my case, I had the good fortune to make this first pair (Oh yes, there will be more!) in the company of the pattern designer, Heather Lou of Closet Case Patterns, and a roomful of really awesome women in the big classroom space at Fancy Tiger Crafts. With Heather there, she could not only demonstrate each step before we did it, but we each arrived for the workshop weekend with our jeans cut and basted together, so step one was a fitting with Heather. There were 16 of us, I believe, and not only did we all leave with finished jeans, they were each fascinatingly unique to the person who made them. Not just in the sense of fit — although there was that. (Look at this video Heather posted. HEART!) But also in the details: whether we were making Ginger skinny jeans or Morgan jeans, zip-fly or button, what color our denim was (stretch or non), what fabric we chose for our pocket linings, thread color, whether we did any fancy stitching on the pockets … so many personal little details. (Mine: Morgan jeans, zip fly, dark indigo denim, non-stretch, striped khadi pocket linings, gold topstitching, no pocket decoration.) When we all stood together in our JEANS on Sunday for class photos, I could hardly stand how awesome it was. They all looked so legit and professional, and yet there was no chance of mixing up any two pairs. We had all made our mark.

MADE: My first jeans

I did get a little stressed out at the end of the day on Saturday — the second of two all-day days of being in a room sewing nonstop (with a half-day left to go). I was determined to get the shape of the thigh exactly right. Heather had asked us not to concern ourselves too much with perfection on what was sure to be our first of several pairs. But I didn’t want to leave with a pair that didn’t quite fit me in the same exact way as the other jeans already in my closet don’t quite fit me. I told myself before I went that I would rather come home with a pattern piece for the leg that was just what I wanted than with finished jeans. So I was taking the time (and Heather was indulging me) to tweak the thigh, at a point where I was incredibly tired and falling behind. So yeah, I almost cried when I had to do it five times and then catch up with everyone else, but it was nothing to do with the pattern or the difficulty level or anything. It was all me. And it was worth it — I have the customized pattern piece AND the finished jeans.

Well, almost. The only thing I didn’t get done is attaching the belt loops, which I will get around to but am in no rush about, since I don’t even own a belt. And I’m putting off hemming them until they’ve been worn a bunch and washed a few times.

MADE: My first jeans

I’ve been saying for a few years that my goal in life was to one day be wearing a t-shirt and a pair of jeans, a combo as ordinary as possible, except that I made them both — but in all honesty, I never really imagined the jeans would ever happen. It seemed SO far-fetched. As usual, a public commitment to do something is what made it happen for me, and sewing my first Archer this summer really made it manageable. When I unfolded the Morgan pattern to start my homework, and saw that it all fit on one piece of pattern tissue and was fewer pieces than Archer, I let out a little snort of relief.

I am telling you straight up: If you can make a button-up shirt, you can make jeans. I am wearing the proof.

Pattern: Morgan Jeans by Closet Case Patterns, size 12, tweaked for fit*
Fabric: Unknown selvage denim from a friend of a friend’s stash**
Cost: $18 pattern + $40 fabric + ~$2 khadi scraps + $9 hardware kit + $4 top-stitching thread = $73

.

*My only pattern mod, other than the fitting, was to widen/straighten the lower leg.

**The FoF believed it to be Japanese made and dyed with natural indigo, but the friend doubts the latter. Since naturally dyed fabric is basically non-existent in the commercial realm other than some people dabbling in natural indigo denim, I was really trying to find and use a naturally dyed fabric, but this fabric might not have been. I’ll never know for sure!

Special thanks to Heather, also, for snapping these FO photos of me, somewhere near Redstone CO.

.

PREVIOUSLY in FOs: Fisherman sweater redux

SaveSave

SaveSave

SaveSave

Before and After: Fisherman sweater redux

Before and After: Fisherman sweater redux

Happy Labor Day, for those in the US! I’ll have Summer of Basics highlights, thoughts and prize news tomorrow, but I couldn’t wait to show you the “after” pics of my fisherman sweater fix. (See my previous post for the original/full rundown.) I’m not sure how dramatic the difference is in the photos, but trust me: It’s no longer rippling around me; gone is the cape effect in the back, the rolls of fabric with nowhere to go; and it is a sweater instead of a tunic. Whereas before I was thrilled with it as a piece of knitting, now I’m thrilled with it as a garment. Even my husband, the only other person to have seen it in person both before and after, took one look, nodded, and said, “It looks good now. You saved it.”

As I had postulated, I’d simply gone much too wide and a bit too long with it when I initially blocked the pieces. In the “before” (left) photos, it was about 43″ at the chest (8.5″ ease), 46″ at the hips (7.5″ ease), and roughly 26.5″ long. Which could be totally fine for a lighter, thinner sweater with less surface density, but was not working with this fabric. By giving the finished garment a nice long soak and then being more gentle in laying it out, it’s now more like 41″ in the chest (6.5″ ease), 44″ at the hem (5.5″ ease), and about 25″ long.

Before, it was not too terrible looking from the sides, definitely a little long in the front — just a bit too much of a good thing — but looked awful from behind. More to the point, I did not feel cute or comfortable (or even proud) in it. I felt swallowed. Thankfully it was easily fixed, without having to rip out a single stitch.

What is this sorcery, some of you will wonder? A piece of wet knitting is a like a lump of play-doh — you have a lot of power to mold it. In a case like this one, the broken-rib portions and and the raspberry stitch are fairly fixed in their widths, but the cables (just like lace) have quite a lot of give. When I first blocked the pieces, I had pulled them way open, making the fabric wider. Whereas in the reblock, I did not. It’s as simple as that. Likewise, rather than pulling at the length at all, or pinning it in place to dry, I gently coaxed it shorter as I laid it out, and left it free to pull up even more as it dried.

So it took only a few minutes of effort — and a couple days’ wait — and now I finally feel like I have the sweater I wanted all these years. That photo up top is of a dream come true.

See also: How do you block your finished knits?

.

PREVIOUSLY in FOs: The fisherman sweater

2017 FO-11 : The fisherman sweater (SoB-3)

Finished: The fisherman sweater (SoB-3)

The hardest part about making clothes, if you’re like me, is that when you’re done with them you have to put them on and have someone point a camera at you. Many are the times I feel I’ve done a disservice to a lovely garment due to my ineptitude as a “model,” but never more so than with this GLORIOUS fisherman sweater. My love, my holy grail. The reason I wanted to learn to knit. The garment I searched years for in shops and catalogs, then pored over patterns for another five+ years — between when I learned to knit and when I finally cast on. The sweater that’s been my constant companion for the past two-and-half months. Dearest Sweater: You deserve better than me.

So I’m being a little bit coy with the photos here because, basically, I blew it. Although, in fairness, we’re sort of both to blame — the sweater and me. In addition to my awkward self, the photos tell an unfortunate truth about the sweater, which is that there’s just a little too much of it. As a piece of knitting, it couldn’t be more stunning. But as a garment, it’s wide and droopy in the back, too long in the front, just a bit too big throughout the whole body. Schlumpy. (You’ll have to take my word for it.) But it’s fixable.

You may recall how obsessive I was being about the gauge and the proportions — blocking the first many inches of the back and the sleeve, doing my math, calculating for my perfect shape. I’m very particular about proportion, and the actual gauge and dimensions were a bit vague with this vintage pattern. A slight difference in how the gauge was measured could mean my version would be anywhere from fitted to enormous, and which of those it would be would determine how long I made it. (If it was going to be big, it could be on the long side, but if it was going to be fitted, I would make it shorter. I don’t like a long narrow tube of a sweater.) When the first half of the back blocked out to slightly wider than the XL dimensions given, I decided to go with it being oversized, while carefully controlling the upper sleeve dimensions so I wouldn’t appear to be drowning in it. And while the sleeves are fine, I am drowning in the body. Well, not quite drowning, but treading water a bit? And because the fabric is so dense, it matters. The good news is, I think it’s just that I blocked it too aggressively and may be able to fix it simply be reblocking it. It’s not very far from perfect, and if I can coax it a bit shorter, and resist laying it out quite as wide, that may be all that’s needed. It’s literally soaking as I type, and I’ll let you know how it turns out.

If that doesn’t solve it — if it requires surgery — I’m fully prepared to do it. I intend for this to be my forever sweater, and I love it way more than enough to get it absolutely right.

[UPDATE: Here’s how it turned out!]

Finished: The fisherman sweater (SoB-3)

I do believe it was fate that kept throwing this pattern into my path over the past few years, and am eternally grateful to the sweet reader, Catherine K, who sent me the stack of vintage booklets that included the Bernat Book of Irish Knits, seemingly the most popular knitting booklet (and aran sweater pattern) in the history of knitting. I’m so happy I decided to take Summer of Basics as the excuse to finally knit my long-longed-for fisherman, very pleased with my choice of Arranmore for the yarn, so insanely glad that when I finally settled on a pattern it was this one, and I love that I wound up knitting it in its 50th anniversary year. There’s also some poetry to the fact that I charted out the stitches on the flight to Squam at the beginning of June, knitted my swatch on the dock there on a cool early-summer morning, cast on in the car on a trip to see my family, bound off in the car on a trip back from seeing Bob’s family, and did the seaming on my screened porch at home on our first pleasant waning-of-summer day. Now I just have to wait for the weather to wear it!

Pattern mods and details are below, but remember today’s the last day to submit for SoB prizes. If you haven’t already, take a look at the notes on how to enter to win! Judges will deliberate and winners will be announced next week.

FO : The fisherman sweater

Regardless of any of the above, this is the most spectacular thing I’ve ever made and it was really very simple, which I’ll write more about another day. I know it looks complicated, but it’s just a few very straightforward, easily memorized stitch patterns knitted ad nauseum, with a decrease at each end of the RS rows for the raglan shaping, and a standard bit of neck shaping. There’s really not much to it!

The only tweaks I made were as follows:

– It’s essentially the XL at the bottom and scales down a bit in the upper regions, so I started the front and back pieces (on US5 for the ribbing, then US7) with 122 sts but I decreased three times between the ribbing and the underarms, leaving me with 116 each (in between the L and XL) when I reached the underarms. (Note that one of the ways the XL gets its width is there are 2 extra sts between the side cables and the raspberry stitch, which I didn’t like, so that’s where I did 2 of my 3 decreases on the back, with the third at the selvages. For the front, I moved those two stitches to the broken rib. You can see this in the photo below if you look closely.)

– For the cuffs, I cast on 46 sts on US5, increased to 60 on the plain knit row before starting the stitch patterns, and only increased 10 times as I worked the sleeves, so I had 80 sts at the underarms (in between the M and L).

– That meant I had fewer broken rib stitches in my sleeves (10 at each edge) than my sides (14 each). In order for the stitch patterns to stay aligned correctly at the raglans, I just decreased the sleeves more slowly at first than the body, so I arrived at the last of the broken rib stitches on the same row, then decreased evenly (every RS row) on all pieces from there up.

– Because I had fewer stitches throughout at the beginning of the shaping, I only needed to work 64 rows of yoke instead of 68, which made my yoke slightly shorter and spared me the overly deep underarms seen in the pattern photo.

– I did fudge the decreases a bit on the last few rows, since decreasing within the raspberry stitch portions is not normal and not equal from one side to the other — was careful to make sure I worked the same number of rows between underarm and bind-off on all edges, and that I had the same number of sts in each sleeve top at the end. (I kept a few more than the pattern called for — 10 or 12, I think, instead of 8.)

– And then I made up my own neck shaping, since I didn’t like the original and had different stitch counts anyway, but I did keep it high and small like the original — wanted to keep that vintage look.

– I also bound off all stitches and picked up for the neckband — I don’t believe in knitting a neckband from live stitches. I picked up 84 on US6, worked in the half-twisted rib for more like 2.5″ (pattern calls for 3″), bound off on US8 needles and sewed it to the pick-up ridge.

Pattern: Bernat 536-145 from Bernat Book of Irish Knits (1967)
Yarn: Arranmore in St. Claire, 8 skeins
Cost: Free pattern (gift from a friend) + $112 yarn (paid wholesale price)  = $112

You can scroll through all of my posts on this sweater hereInstagram posts here, and put a like on it at Ravelry if you do!

FO : The fisherman sweater

PREVIOUSLY in FOs: My first pants (SoB-2)

SaveSave

2017 FO-10 : My first pants (SoB-2)

Finished: Olive pants (Summer of Basics)

These are pictures of me wearing a perfectly ordinary blue work shirt and olive green pants — ordinary except for the fact that I made them! I believe that’s referred to as leveling up. Thank you, Summer of Basics.

The shirt, of course, is my Archer (my first button-up, and first SoB finish), and the pants (my first pants) are my second SoB finish. They’re nearly as simple as a pair of pants can be — just elastic-waist pull-up pants — but they make me so proud. Mostly because of how much detail I put into them, and how nicely sewn they are, owing to my new serger. (Er, my year-old serger that I finally learned how to use, which has completely changed my life.) I started with the Tessuti Robbie Pant that some of you recommended on my side-pocket pants post. I looked at a bunch of similar patterns, and assumed I’d wind up basically drafting my own, but started with this one because I thought the leg shape looked the most like what I was after. So the four pieces of the pant legs are essentially Robbie, with just some tweaks — a little lower front crotch, a little width out of the thigh, lengthened a few inches and sewn with a wider hem. Then I made up my own pockets, changed the waistband (both the width and how it’s sewn), and top-stitched the hell out of them.

Finished: Olive pants (Summer of Basics)

My biggest concern was how the fabric would work for this, since it’s a fairly heavy canvas. With a thinner fabric, in an elastic-waist scenario, volume isn’t quite so much of a concern, but here I was trying to balance a nice, loose, wide-leg silhouette with not having too much heavy fabric gathered around my waist. These are the size small (I’m about an 8-10 on bottom in store-bought clothes, for reference) and they’re still a tiny bit big, even with my tweaks. I have a long waist, essentially no hips and a flat rear-end, so I tend to wind up with too much fabric pooling around my butt and the sides of my hips, no matter what kind of pants they are. I did pretty good on these for a first go, but on the next pair I’ll redraw the outer leg line, and also change the rise in the back — the line where the upper edge of the pant meets the waistband is too high for my liking. But regardless, I love these and can’t wait to draft the next pair.

Finished: Olive pants (Summer of Basics)

The fabric came from Elizabeth Suzann’s recent garage sale. It’s slightly more olive than army, so I have to be a little careful what I put with it, but it’s really nice stuff. I got a bolt of unknown yardage for $100 — a lifetime supply, basically. If I underestimate it at 30 yards (knowing it’s probably more like 50), that makes it about $3/yard at the most. Unless I never make anything else out of it, in which case the fabric for these pants cost me $100!

There’s also a secret happy detail to them: I reused the 2″ elastic that came out of my ancient, beloved, threadbare pink pajama pants I recently had to say goodbye to. So they’re still with me! ;)

Pattern: Robbie Pant by Tessuti (modified)
Fabric: Unknown canvas remnant
Cost: $8.00 pattern + ~$4.00 fabric + reuse elastic = $12.00

p.s. These photos were taken by my husband in his painting studio. For those of you who’ve asked about his work before, note that we recently updated his website

.

PREVIOUSLY in FOs: Best-ever baby gift