

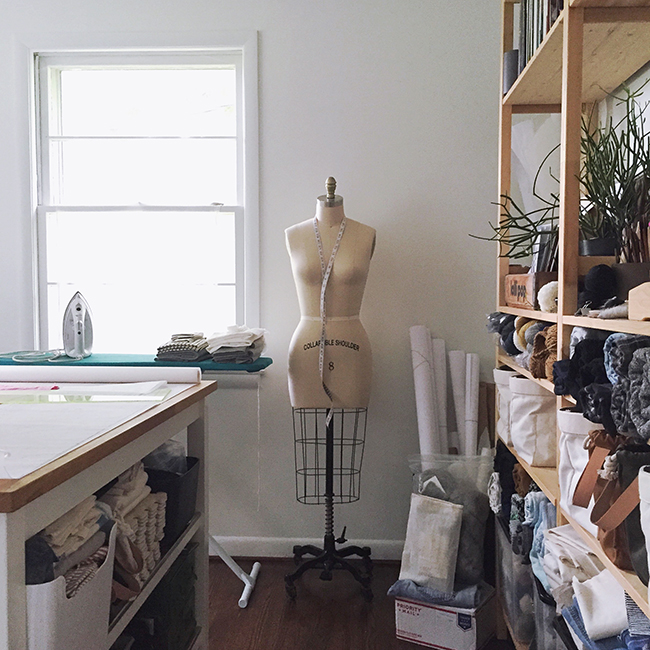

Easily the one thing I get asked about more often than anything else is … my dress form. Every time I post a picture of it (ref. above), there’s a handful of people quite reasonably asking where I got it, do I like it, how did I pick it? I know exactly nothing about dress forms — mine came from the first page of a hasty search on Amazon for “collapsible shoulder dress form,” and I use it to hang things on in our booth at shows and for taking photos of WIPs in my little workroom at home. It tells me nothing, really, about how anything will fit me since we’re completely different, she and I. She has narrow shoulders, meaningful breasts and a nice short torso; I’m the exact opposite of all that. She’s nothing but a prop. So I’ve asked pattern designer Liesl Gibson (of Oliver + S and Liesl + Co) to give us her expert thoughts on the subject! For more of Liesl’s bottomless wisdom, check out her blog and her Instagram, and if you’ve never watched her bias tape tutorial on Creativebug, I’m telling you: It changed my sewing life. (No pins!)
[N.B: Don’t miss the SALE news at the end of this post!]
. . .
KT: So, Liesl, this is a one-big-question inteview: Does the average home sewer or knitter need a dress form — and if so, what kind?
LG: Whether you need or can use a dress form depends a lot on what you want to do with it.
Many dress forms or mannequins are made solely for display in stores for merchandising the clothing. These can be great for taking photos of your sewing projects, but they’re not very useful for sewing or for draping because they aren’t very accurate in terms of body shape or sizing. On the other hand, if you’re a blogger and hate to pose for photos, go for it! I totally support this idea, especially given my personal dislike of posing for blog photos.
Here’s the truth about dress forms: Many people assume that a dress form will be really useful for making clothes that fit properly. But unless you have draping skills and plan to drape your clothes from scratch, it’s very likely that you won’t make much use of one. I was pretty certain I needed one when I graduated from design school, and then I got one and it served mostly to frighten the internet installation guy until I finally sold it.
Personally, I find that I prefer to fit clothes directly on my body. It’s difficult to find a dress form that mirrors your body, and truthfully I think it’s really important to feel how the clothing feels and looks on your body: How much easy do you need; where does the neckline look best; can you bend over, turn, and breathe? And if you don’t know how to drape, there’s a good chance you won’t know what to do with a garment once you get it on a dress form anyway. If you fit a pattern to your own body you’ll be able to see and feel what needs to change.
Yes, there are all sorts of custom options out there: the duct tape dress form, padding a basic dress form to mimic your body, 3D modelling, etc. They each have advantages and disadvantages. One distinct disadvantage of a duct tape dress form is that, although it’s quite inexpensive to make, you can’t pin into it without gunking up your pins. And frankly, when you’re wrapping yourself in duct tape (or someone is wrapping you), it’s going to distort your body, so the finished dress form won’t be very accurate. The custom models can also be really expensive. Padding a dress form to mirror your own body can be done, but it’s complicated and difficult to mimic your shape and stance. Are your shoulders forward, or is one higher than the other? How straight is your back? If you don’t get the essential posture of your body just right, the dress form probably isn’t going to give you the results you want. 3D options can be quite pricey for something you might not use as often as you think you will.
Having said all that, I own two dress forms. Here’s how I use them.
For our Oliver + S kids patterns I use a traditional Royal form, which is basically a paper mache torso, legs, and arm covered with linen. This dress form works well for checking the fit and proportions on our sample size, but I mostly develop patterns with a flat pattern technique, so the dress form serves mostly as a check to confirm that the patterns fit and look well before they’re graded. Once all the sizes have been developed we do a lot of further testing on real bodies to check the sizing and fit for all the various sizes.
For our women’s Liesl + Co patterns I use a custom AlvaForm, and I love it because it’s anatomically very accurate. By that I mean that the shape is much more accurate than the traditional dress forms like Wolf and Royal, so the fit through the bust and armhole can be better than it would be with a traditional form. If you’ve ever sewn a pattern that gapes at the armhole even if it fits well through the bust, chances are it was developed or fitted on a traditional paper mache form that didn’t allow correction of the concave area between the bust and shoulder. Alva forms solve this problem but are very expensive (and the shipping from Asia costs almost as much as the form itself!), so this is really not an option for most home sewists. But again, on a professional pattern-making level this form allows me to develop sewing patterns that adhere to a standard fit before we grade to develop the different sizes and test those sizes.
However, I never rely solely on a dress form for pattern development. It’s important to see how a pattern fits and feels on real bodies, so we do lots of fittings and wear testing before a pattern is ready for grading. I sew our women’s patterns for myself and wear them for a few weeks, at least, before they’re graded. I make basic pattern adjustments for my body when I sew the samples — I’m longer waisted and smaller busted than our standard sample size — and this way I can tell if there might be as issue somewhere in the basic pattern. Maybe I notice that the armhole is too high or that the neck is uncomfortable, or perhaps it needs more room across the upper back so you can move. This is the role that a traditional fit model plays, but of course being the small company that we are I don’t have the budget for a professional fit model. So I alter the patterns for my body and fit test them myself. I also rely on our pattern testers to do the same so we can check the sizes on a wide variety of body shapes and sizes, and I sew the samples for our photo shoots so I can check the fit against our models as well. (I have a very reliable group of testers — some experienced and some quite new to sewing — who help me with a lot of this process.)
But when it comes to sewing for myself for fun, I sew for my body and don’t use a dress form at all. And that’s despite the fact that I’m quite close in size to my Alva dress form! I honestly don’t use it for myself. It’s much more useful to fit the pattern to my body in the form of a muslin. This is what I teach in my fit classes, too. It helps to have a sewing buddy who you can work with, but none of my friends sew so I do it myself. I make a muslin, look in the mirror, ask my husband or daughter to take some photos from the angles I can’t see very well, and then I take off the muslin and make adjustments before starting the procedure again. It’s trial and error until I like the result. My best tools for fitting? A mirror, a camera and a copy of “Fit for Real People,” which I highly recommend to all my students and all our customers because it explains how to get a good fit in ways that are relatively intuitive, with lots of photos, diagrams and examples to help you along the way.
So do you need a dress form? It’s sort of up to you, but I generally counsel against it. It looks cool in a sewing room and in blog photos, but unless you’re developing sewing patterns yourself my personal opinion is that you won’t get very much use out of it. Use your own body and a few tools, and you’ll get much better results.
. . .
Thanks so much, Liesl! Happy weekend, everyone—
IN SHOP NEWS: We’re clearing out the magazine shelves and a few other straggling gems — check out the Sale section for some rare markdowns while they last! But I should also warn you we’re expecting the long-awaited Lykke (full/standard) interchangeable sets to finally arrive this afternoon (although I’ve probably jinxed it by posting that). We’ll put them back in the shop the moment they arrive, so check in late today! [UPDATE: The Lykke needle sets are here!]
.
PREVIOUSLY in What I Know About: Holding yarns together
SaveSave
SaveSave
SaveSave